What we like
- Ships per-assembled
- Offers high-speed printing
- Superior print quality
- Touchscreen display
- Excellent price
What we don’t like
- Does not support multi-color printing
- Can be quite noisy
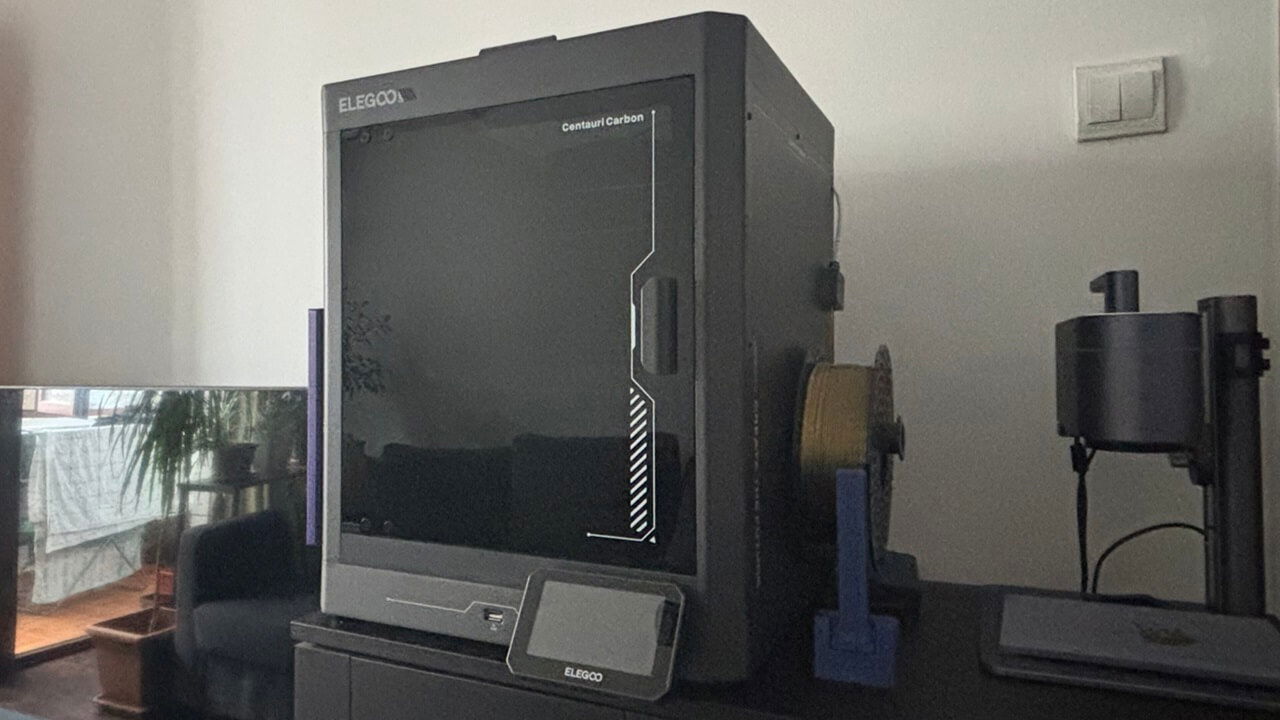
3D printing has come a long way, with more choices than ever and prices dropping across the board. That means high-quality printers are now within reach for more users. One standout is the new Elegoo Centauri Carbon, possibly the most affordable enclosed 3D printer available today. Elegoo sent us a unit, and we tested it to see if it lives up to the hype.
Introducing the Elegoo Centauri Carbon
Elegoo has built a solid reputation in the 3D printing space over the past decade, thanks to successful releases like the Neptune series. Now, the Elegoo Centauri Carbon 3D Printer marks its first Core-XY printer, offering a beginner-friendly option for those just getting into 3D printing.
Note: a Core-XY 3D printer is a type of FDM (Fused Deposition Modeling) printer that leverages a belt-driven motion system for the X and Y axes, delivering enhanced speed, accuracy, and operational efficiency over traditional Cartesian designs.
The Centauri Carbon is all about getting you up and printing with minimal hassle. It arrives mostly pre-assembled, with only a few extra steps needed—like attaching the glass panel at the top. Overall, the setup process was straightforward, as all the tools and instructions needed for assembly were included in the box, though I did need my partner’s help lifting the printer out of the box – it has some weight to it!
Specs
Designed for rapid output, the Centauri Carbon boasts a maximum print speed of 500mm/s and 20,000 mm/s2 acceleration, all supported by a durable, space-gray, fully enclosed die-cast metal chassis.
The Centauri Carbon features a 256 x 256 x 256mm build volume, a common size for FDM printers. In FDM applications, thermoplastic filament is heated in the hot end and extruded through a nozzle, layering material onto the print bed to gradually form the desired object.
The printer is equipped with a hot end capable of reaching 608ºF (320ºC) and a build plate that can heat up to 230ºF (110ºC). Its dual-sided print bed enhances material compatibility with one side ensuring optimal PLA adhesion, while the other accommodates a wide range of filaments. This includes PETG, TPU, ABS, ASA, PLA-CF, PETG-CF, PET, PC, and PA.
The Centauri Carbon also includes a built-in cooling system with multiple fans to prevent heat buildup. There’s a model fan under the build place, an auxiliary fan for the hot end, and a case fan, all working together to keep the temperature in check.
Printing My First 3D Object
The Carbon Centauri simplifies 3D printing for newcomers by taking out the guesswork. It performs all the necessary calibrations and optimizations, including auto-leveling, for a perfectly even build plate, ensuring strong first-level adhesion, setting the foundation for flawless prints.
Once the printer completed its self-check, I connected it to my local Wi-Fi and fired up the Elegoo Slicer software on my Windows laptop. The Carbon Centauri ships with a USB drive preloaded with the software and test prints. Alternatively, the software is available for download from Elegoo’s website.
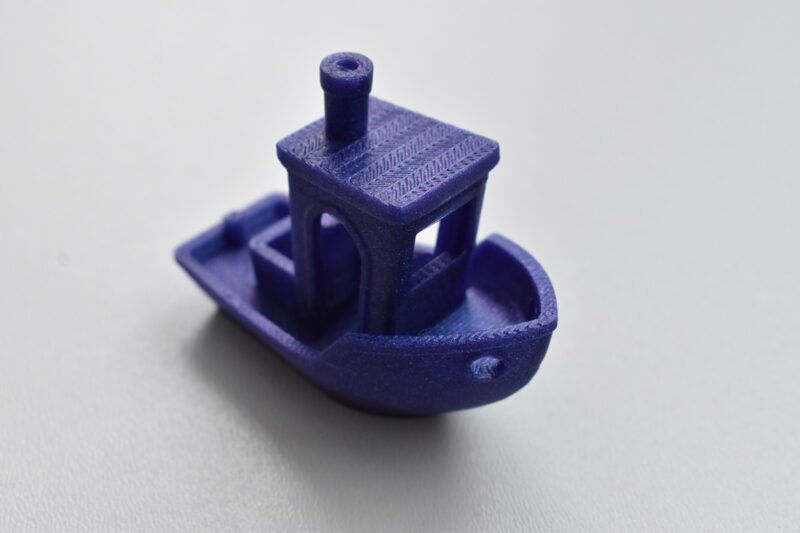
To kick things off, I decided to print the Benchy, a well-known 3D printing benchmark designed to assess accuracy and highlight potential inconsistencies. With a short 20-minute print time, it’s an efficient way to evaluate a printer’s capabilities.
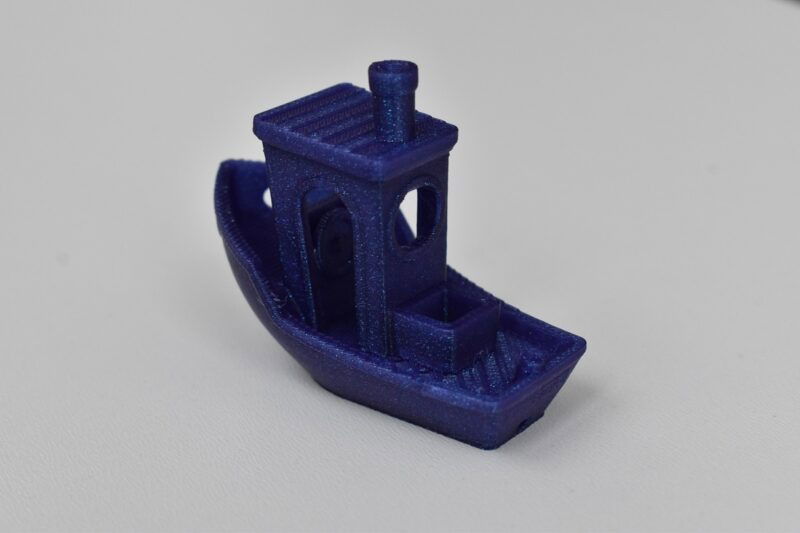
For this print, I used the provided Elegoo PLA roll and standard settings, and it yielded fantastic results. I was impressed by the Benchy’s flawless finish, and there were no noticeable defects in sight, either.
Software
With the Centauri Carbon 3D Printer, you get access to Elegoo’s proprietary Slicer, which offers a clean, intuitive interface. That said, you’re not restricted to it – you can use any other slicer that best fits your workflow.
Since Elegoo’s Slicer is based on the Orca Slicer, anyone who has used Orca before will probably feel right at home. The similarities go beyond just the interface – they also share many of the same features and overall performance.
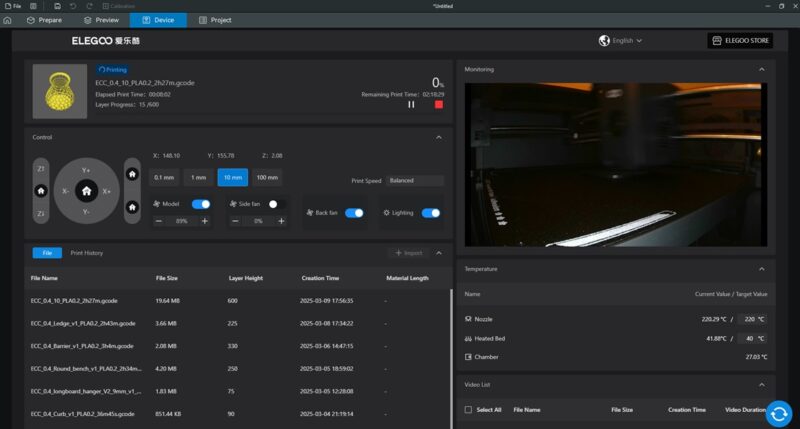
I enjoyed a smooth experience using Elegoo’s Slicer, as I found it generally easy to navigate. However, there will be a learning curve for 3D printing newcomers. You’ll have to do some research to better understand all the settings, but that’s only to be expected. I installed the software on my laptop, but you don’t have to be tied to one device – you can access the web interface from any device on the same local network, similar to how you would connect to a shared printer.
Elegoo’s Slicer features a live webcam view, allowing you to monitor the inside of your printer in real time. You can keep an eye on your prints, even if you’re not physically near the machine.
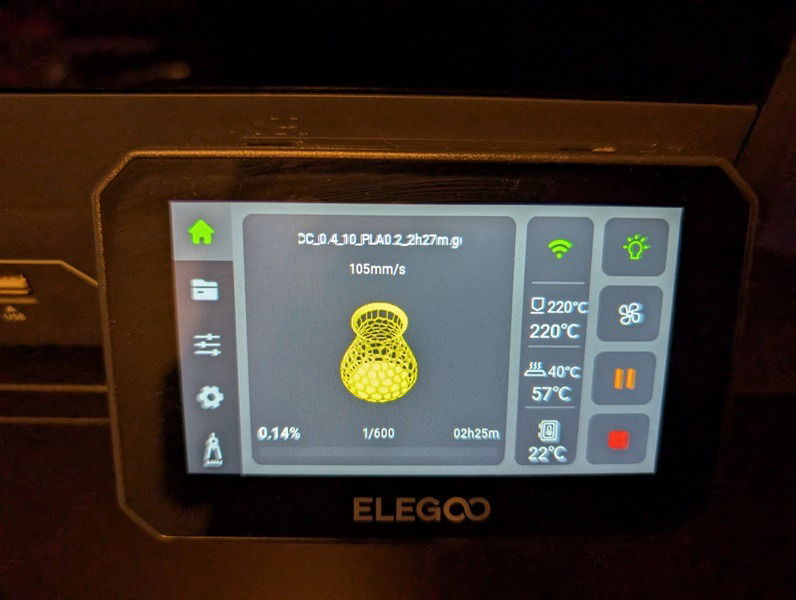
The printer also includes a 4.3-inch color touchscreen that lets you easily fine-tune print settings. Once your file has been sent to the printer, you can adjust key settings, such as bed temperature, directly from the touchscreen, ensuring an optimal printing experience.
The printer lets you send your files over Wi-Fi, and in my experience, this generally worked well. I did run into a hiccup where the Slicer randomly stopped sending files to the printer, throwing an error instead. I managed to fix it by disconnecting the printer from Wi-Fi and reconnecting it. But if you’re in a rush and don’t want to bother with that, you can always just use the USB stick to transfer your files – which was my initial approach.
Using the Elegoo Carbon Centauri 3D Printer
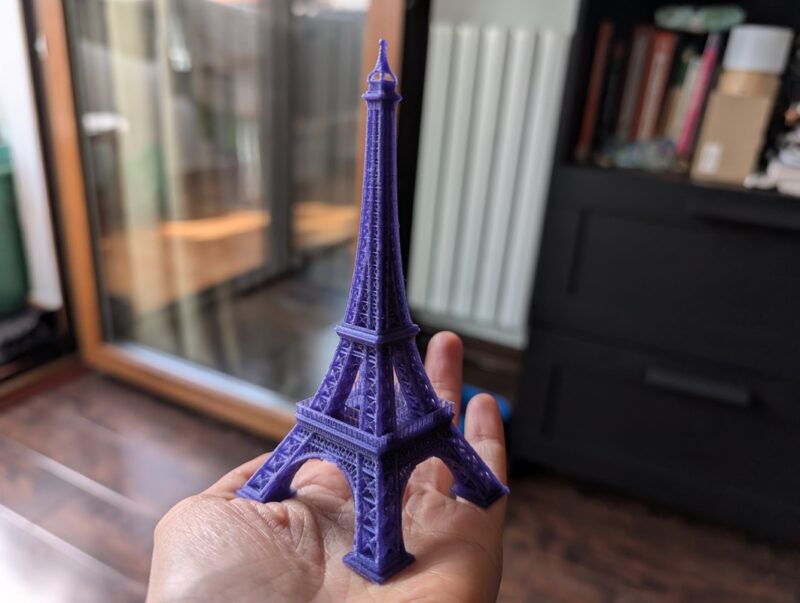
In addition to the classic Benchy, the Carbon Centauri 3D Printer comes with several other preloaded files, and I decided to test some using Elegoo’s included PLA filament. One particularly interesting print was the Eiffel Tower, which was completed without any supports (auxiliary structures printed to stabilize parts of the model that might otherwise collapse) and still turned out excellent. I only had to remove a few minor stray strings using a lighter.
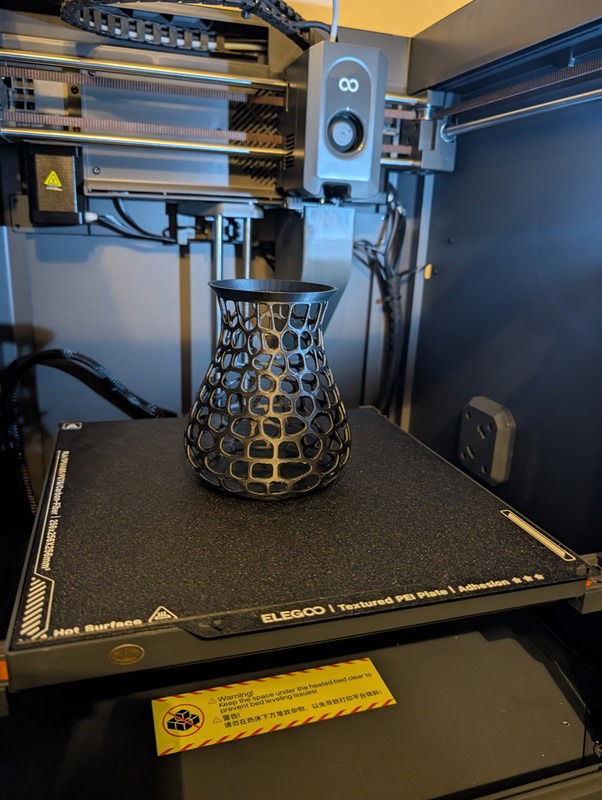
Similarly, I printed a vase with holes without supports (although using a third-party PLA filament), and overall, the results were good. However, a couple of holes didn’t print properly ending up merged with adjoining ones.
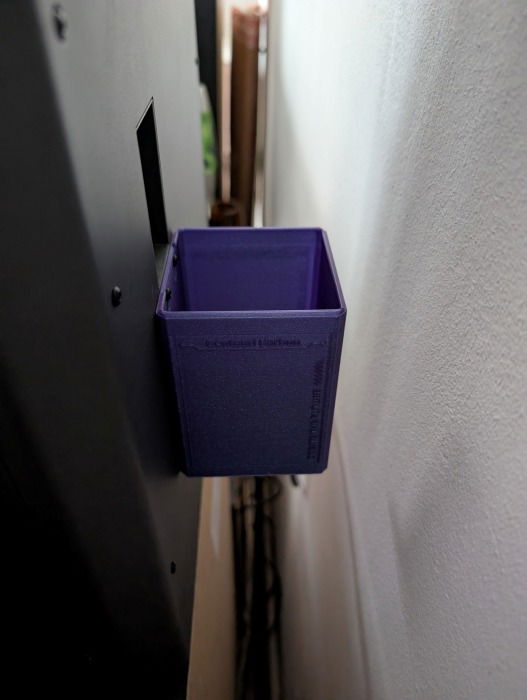
I recommend printing the included “poo bucket,” which attaches to the printer’s chute at the back. This bucket collects the purged filament that would otherwise be ejected outside the printer, helping to keep your workspace clean and free from stray bits of filament.
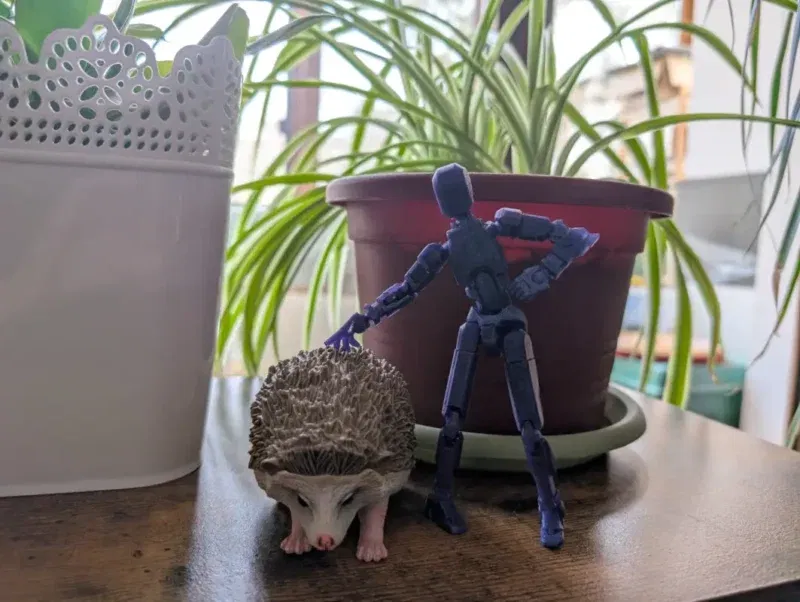
I also experimented with printing a few modular objects, the kind where parts like arms and legs can move. What’s cool is that I printed them all in one go, with no need to print separate pieces and assemble them later. They came out looking excellent and fully functional.
In general, prints made with Elegoo’s PLA filament always looked fantastic! This probably also has to do with the fact that the included prints have been calibrated perfectly by Elegoo for optimal results.

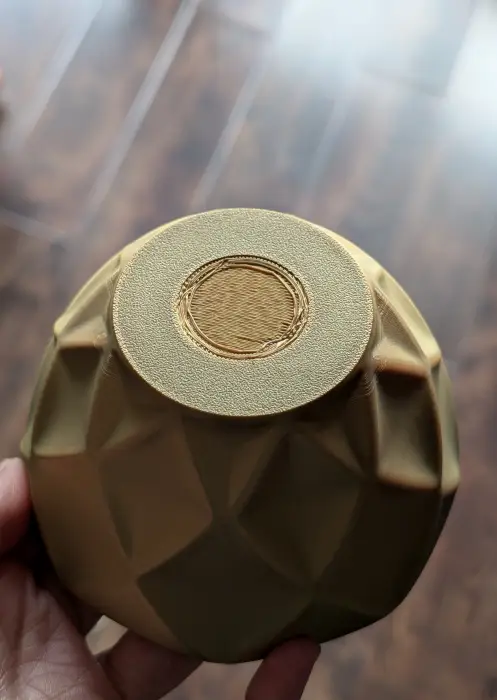
However, when using a different brand of PLA filament, I noticed an increase in small imperfections here and there — but that’s most likely not the printer’s fault. It has to do with using the right settings for each filament and model. Some competitors provide an auto-print calibration option, but the Centauri Carbon does not include such functionality, requiring users to make their own adjustments for optimal results.
As a case in point, I’m still in the process of experimenting, trying to find the best calibrations. For instance, I couldn’t get the back of this bowl to look absolutely flawless.
Want to print in multiple colors? With the Carbon Centauri, this requires a bit of extra work, as it can only handle one filament color at a time. You’ll need to print each section separately and piece them together afterward. While swapping filaments is a simple process, it does take some time. I was a bit nervous the first time, but the instruction manual guided me through it seamlessly.
Final Thoughts
Despite some minor flaws, the Elegoo Centauri Carbon 3D Printer delivers impressive performance, while most issues – such as seam lines, a common challenge in 3D printing – can be addressed through fine-tuning via the Slicer. The printer is user friendly, produces solid results, and is exceptionally easy to set up. While it does generate some noise during operation, this is a small drawback given its highly competitive $299.99 price. Pre-orders are now available, with shipping anticipated before June 30, 2025.
Subscribe to our newsletter!
Our latest tutorials delivered straight to your inbox