The best way to install Windows on your PC is to download it online. However, when you need to install Windows on another device, address operating system failures, or require a USB recovery tool, an offline installation method is better. We’ll show you how to create your own bootable Windows USB disk.
Minimum Hardware Requirements
- Windows 11: the device on which you plan to install Windows 11 should meet these basic hardware requirements: 4 GB RAM (8 GB is recommended), Trusted Platform Module (TPM) version 2.0, a high-definition display (720p), and a DirectX 12 compatible graphics card.
- Windows 10: 2 GB RAM (for 64-bit device), DirectX 9 or later, and an SVGA resolution (800 x 600).
- USB drive: at least 8 GB of free space (16 GB is better).
Getting the Boot Disk Installation Tool
The first step in creating a bootable Windows USB is to download the boot disk installation tool. The source of this tool varies depending on whether you’re using Windows 11 or Windows 10.
Windows 11
Go to the official Windows 11 software download page. There are three ways to download and install Windows 11. The first method, Windows 11 Installation Assistant, is fully online and doesn’t require a USB drive.
The second and third methods, Windows 11 Installation Media and Windows 11 Disk Image (ISO), are fully offline and can convert a USB drive into a bootable drive. Just click Download Now in either case. You can also convert your installation into a CD or DVD if your laptop or PC has those drives.
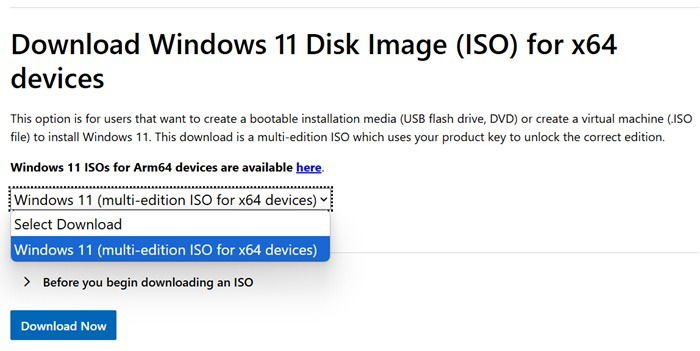
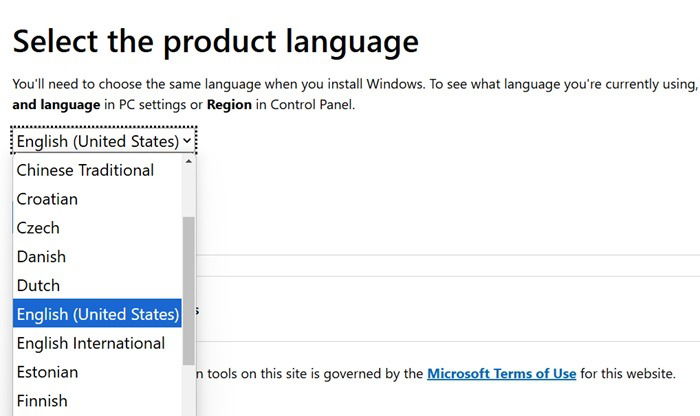
In the case of the ISO, this is the only chance you’d get in selecting the product language. So, choose your language carefully., and click Confirm. Your request takes a few seconds to validate.
If you want, you may further verify your download from the PowerShell window using a Get-FileHash cmdlet. The instructions will be clearly mentioned on the download page, so we won’t get into that one.
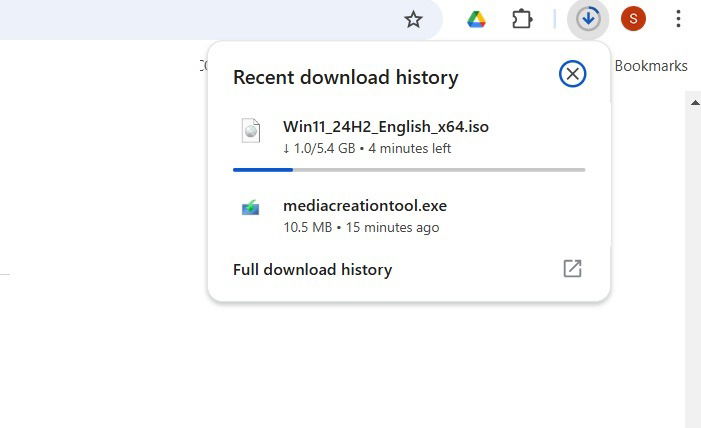
For the ISO, just click 64-bit download and it should be available as a disc image file download. You can see its Live download status on your browser. As the ISO is more than 5 GB, it’s good to have access to a fast Wi-Fi connection.
The Windows 11 Media Creation Tool download is only a few megabytes in size, so the download process should be quick.
Windows 10
The process to download Windows 10 for creating a USB is similar. Click here to go to Microsoft’s website for Windows 10.
Unlike Windows 11, where you have separate downloads for the media creation tool and the ISO, here you have a single media creation tool download that can be further mounted as an ISO.
Once the downloads have been completed for your respective operating systems, the next step is to install Windows on a flash drive.
Create Bootable Windows USB through Installation
The process to create a bootable Windows USB slightly differs based on your operating system and the software file you downloaded in the previous step. Here is a quick primer on how to do it.
Windows 11 Using Media Creation Tool
Double-click on the Windows 11 Media Creation Tool which you must have downloaded earlier. Keep your USB drive ready. All your personal data on the drive will be wiped clean. If you have any important files on the USB drive, take its backup elsewhere.
On a pop-up window for “Applicable notices and license terms,” click Accept to continue. The screen will change to “Getting a few things ready,” which can take a few seconds or minutes.
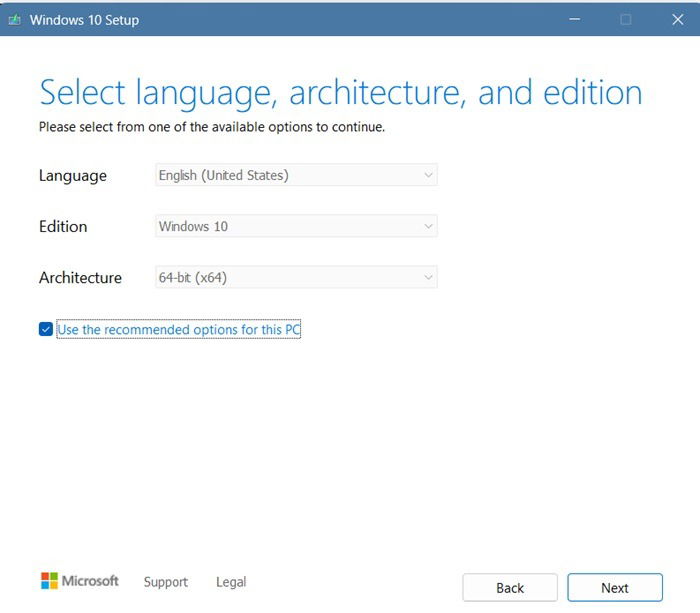
In the following screen, you get to select the language and edition for Windows 11. After you uncheck Use the recommended options for this PC, you can choose a different language. Click Next to confirm your choices.

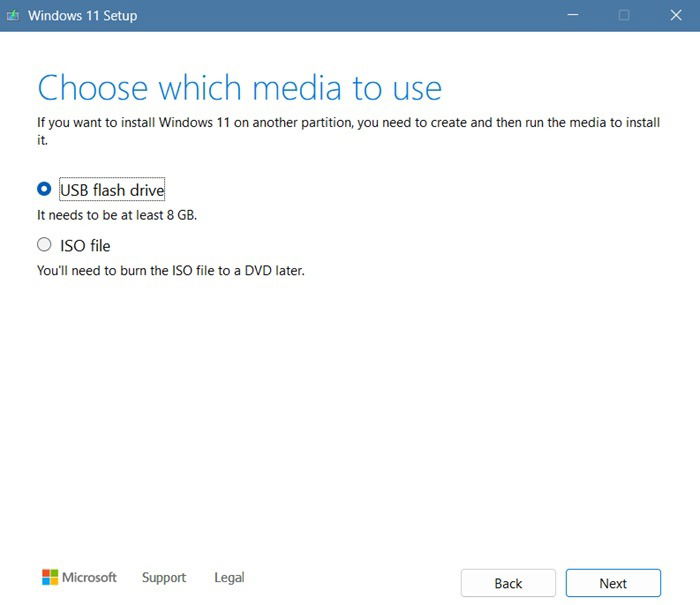
On the “Choose which media to use” screen, select USB flash drive, and click Next. It is at this point that you need to insert a flash drive with at least 8 GB of free space. In the next screen, you will be asked to select a USB drive, listed under Removable drives. Click Next to confirm it.
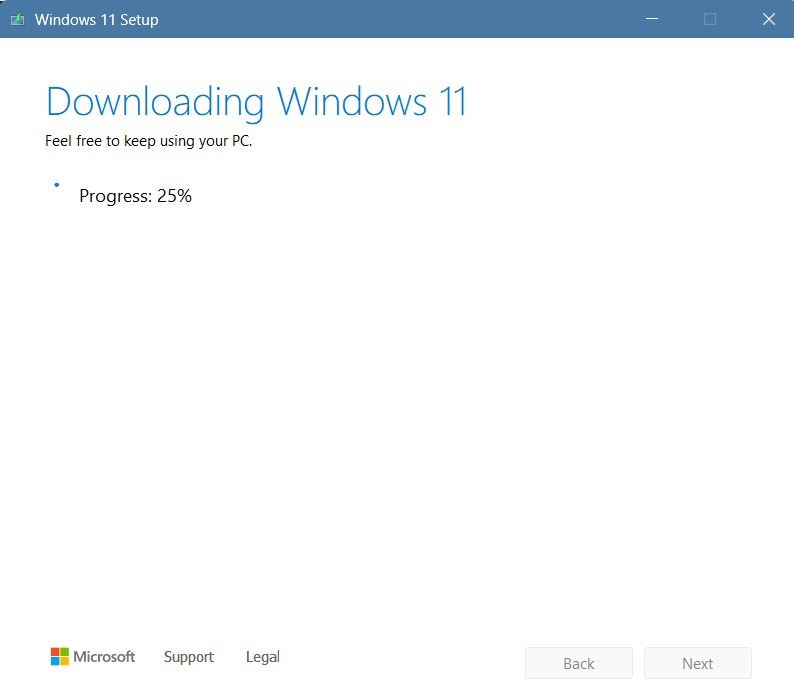
Wait for the Windows 11 download to complete on your USB device. You can monitor its Live status as a percentage.
Once the download is finished, the process will automatically proceed to the next screen, stating “Creating Windows 11 media.” This step can take several minutes, depending on your RAM, CPU, flash drive, and Internet speed.
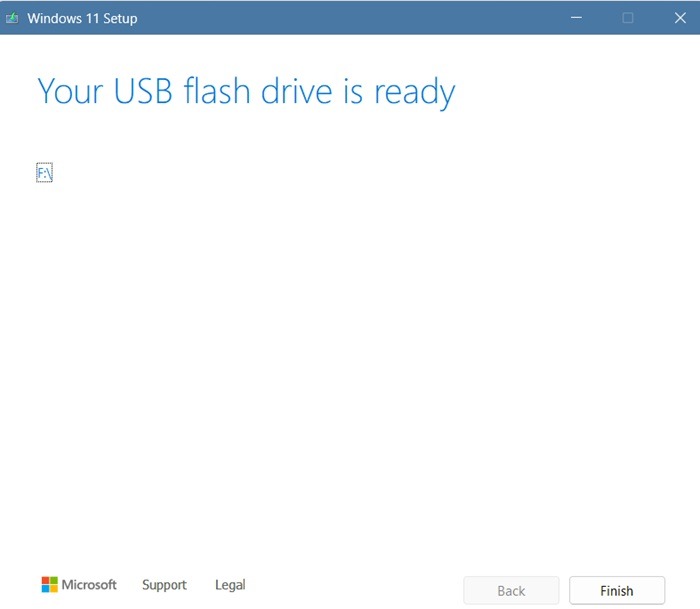
On the final screen, you will see a status message indicating that your USB flash drive is ready. Click Finish. The setup process will take a few more seconds to complete its final steps.
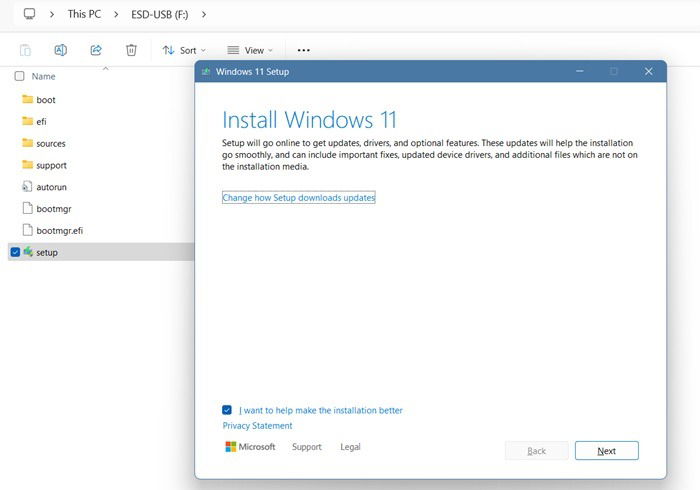
Whenever you insert the bootable Windows 11 USB drive into any Windows 11-compatible device, you should see a USB partition drive letter (F in this case) with a setup file. Double-clicking on that setup file will install Windows 11 on the device. You can now safely use this USB as a portable recovery tool for your Windows 11 operating system.
Windows 11 Using ISO
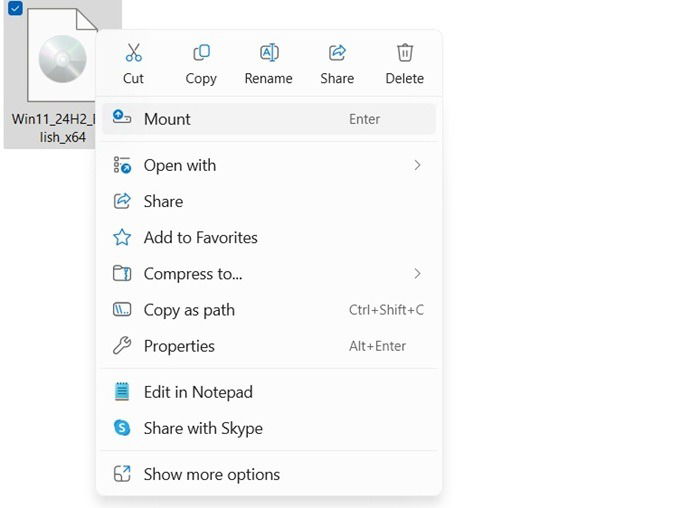
After you download ISO for your Windows 11 device, you can view it at a saved location on your PC. Just right-click to select Mount which will open the ISO in a saved folder on your device.
It will contain the same setup file which we saw in the previous step. Of course, double-clicking on that allows you to reinstall Windows 11 on your device. But that’s not what we’re after. Our task is to load this Windows 11 ISO to a bootable USB drive.
In order to load the Windows 11 setup ISO to a USB drive, you will need an application such as Rufus. It’s very easy to download it at its official link. You can go for either the portable version or the full EXE installer.
After downloading Rufus, insert a USB drive. It will automatically be recognized under Drive Properties in the Device section. Here, it is shown as “G” drive. Click Select to attach the Windows 11 ISO file from the folder where you’ve saved it.
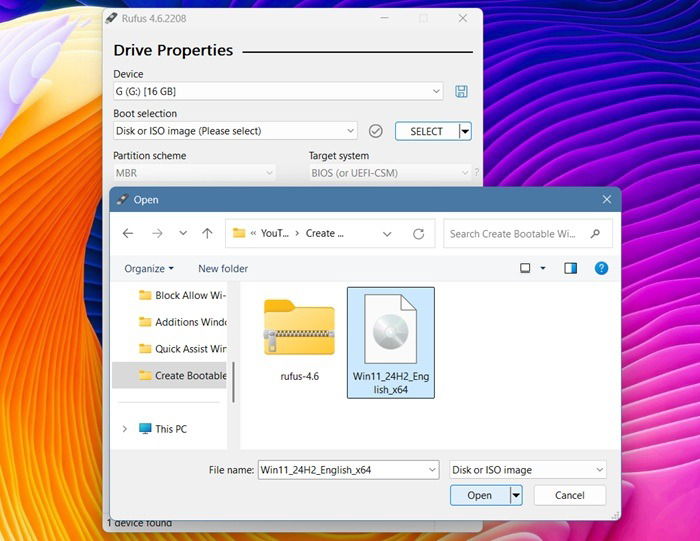
The Windows 11 ISO will be visible under Boot selection.
As soon as you click Start, you will have a choice for a customized Windows 11 installation. Here, you can bypass requirements such as 4 GB RAM, Secure Boot, and TPM. These settings are crucial when your device cannot run Windows 11 on its own. You can also bypass the need for a Microsoft account using Rufus.
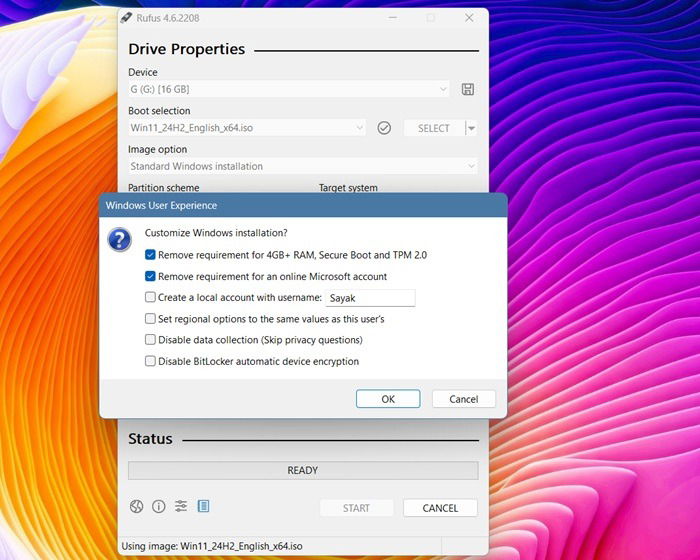
If you want a normal installation, uncheck the above fields, and all data on the given USB drive will be destroyed. Wait a few minutes for the ISO files to be copied to the USB drive. You can monitor the progress under Status.
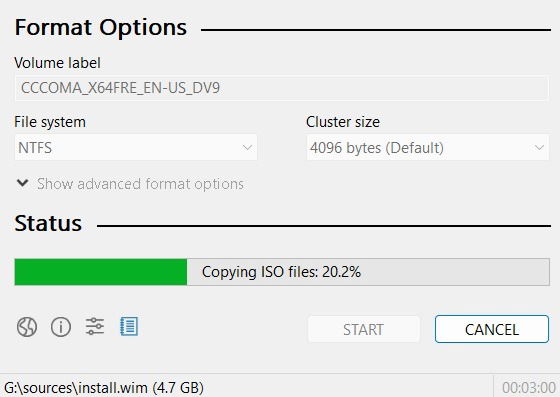
The Windows 11 installer files should be visible next to the USB drive folder on your PC. Unlike the bootable disk created using the Media Creation Tool, here you will see a folder path beginning with letters such as “CCC…X64.”

Windows 10
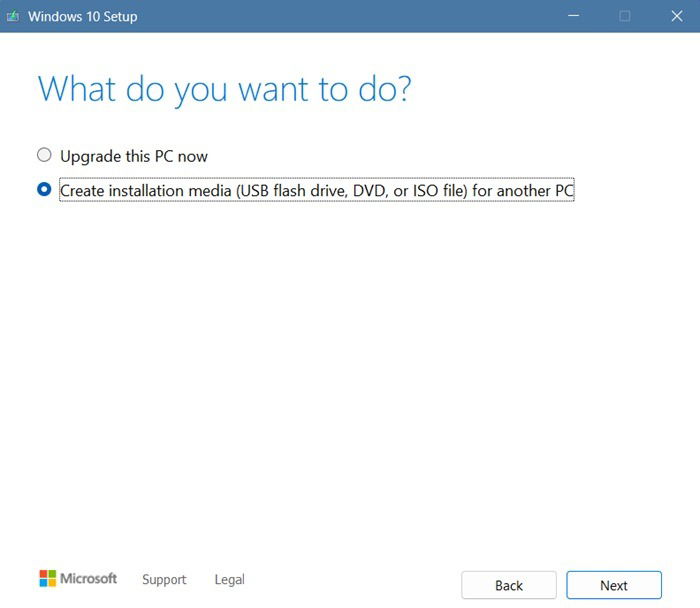
Double-click the downloaded Windows 10 Media Creation Tool. Accept the license terms and agreement and you will see a different screen from what you did with the Windows 11 installation steps above. Here, you can either select “Upgrade this PC now” or “Create installation media for another PC.”
“Upgrade this PC now” will start a Windows 10 download and allow you to switch your current PC (even if it’s a Windows 11 PC) to Windows 10. Choose the second option for creating a bootable Windows USB drive.
In the next screen, again, you’ll be choosing from language, architecture, and edition, which as we saw in the case of Windows 11, can be customized by unchecking Use the recommended options for this PC.
The rest of the steps are the same as covered in earlier sections. You only need to select a USB drive. After that, the latest version of Windows 10 will download on your drive, and it can be used as a portable installer.
In this guide, we saw all the possible ways to create a bootable Windows USB installer for both Windows 10 and Windows 11. In case you run into any trouble while copying Windows files into your pen drive, our guide will help you make it formattable and usable. You might also need help to format your USB drive once you’re done installing the operating system.
Image Credit: DALL-E 3. All screenshots by Sayak Boral.